Over the last few of years I’ve had a the opportunity to work with a team of intelligent and thoughtful colleagues, speak at conferences, and collaborate with other facilitators and community builders. During this time, I’ve help create community maps and strategic plans with my own team and with many other groups. More and more often, I get asked at conferences or on the blog for more information about how to create a community map or content plan. So, I thought I’d take the time to document my recommended processes here!
A note about DIY
There are companies and tools that offer “solutions” for tracking, measuring, and even “engaging” with your community online. If you have the budget and desire to go down this route, that’s great. I like to offer suggestions that any organization or community group can put to use regardless of sector, focus, size, geography, or budget. The tools and methods here are designed to be flexible and adaptable so that you can make them work for your organization and needs. In line with creative commons and the general DIY ethos, if you have a way to improve them then please do share back!
Community Map
Why: Why map your community? So you know where all your members are, of course! But more than that, this exercise helps identify where you should concentrate efforts, where to distribute messages, and where you have the best chance of successfully engaging the community to support your work.
How: You can do this by yourself, but I recommend doing it as a team or even as an organization. You’d be surprised at the kinds of conversations that emerge when you start talking about your community, especially as it is understood by various departments in your organization.
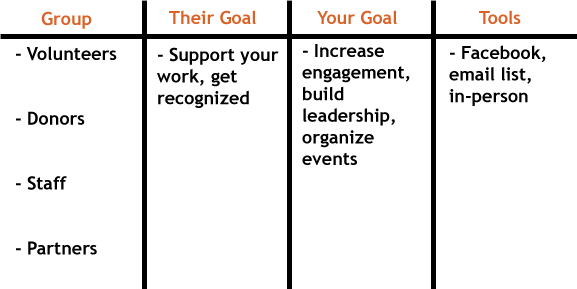
- Create a chart – either on a whiteboard, a flipchart, or even a document on your computer.
- The 1st column has all of your groups or segments of the community;
- The 2nd column is their goal – try to keep this as general as possible like the examples above.
- The 3rd column is your goal for the interaction with that group, and again you want to keep it pretty high level.
- The 4th column is for the tools where that segment wants to be interacting with you.
Here’s an example:
What next: Using this as an exercise for a team or staff meeting, or even retreat, really gets people talking and sharing experiences from different departments and can help the entire group feel better positioned to engage.
Content Map
Why: Things start getting a little bit more complicated at this level but the output here is something your team and organization can then use every day. Creating a go-to resource like this that maps all content and all platforms will help everyone in your organization understand the “where”s and “what”s that make up the entire online presence of your organization.
How: I find it best to create this chart in a spreadsheet – I’ve even created a template for you to reuse!
- First, start by putting in all your content types – whether it is something your organization creates or something the community creates.
- Next, note to the left of each content type what the goals are for that content.
- Along the right, list every kind of communications method you have, and be specific. Don’t list facebook, but DO list “facebook page” and “facebook group” separately, or if you have two pages list them as such. You can really use any method you want, but on my team we use X for a confirmed method, a O for a “if it is relevant” method, and blank if it isn’t used.
Here’s an example:
What next: You now have a chart that can be referred to daily, across the organization! This content map can help everyone know where information flows and where conversations may be taking place. Especially for organizations where only one person or one team engages online, this chart helps everyone know what pieces of content are distributed and how other teams can share what they are doing online (even if it still goes through that one team or one person).
—–
Extra credit:
Want help getting started finding your community online? Create a listening dashboard with this step-by-step guide!


