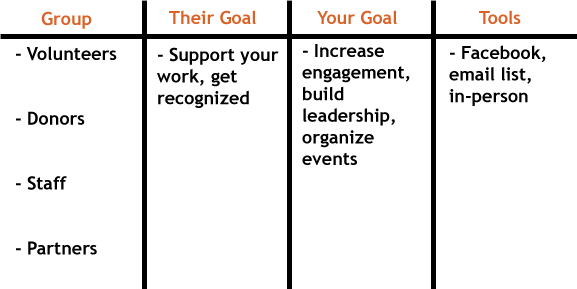
Why map your community? So you know where all your members are, of course! But more than that, this exercise helps identify where you should concentrate efforts, where to distribute messages, and where you have the best chance of successfully engaging the community to support your work.
You can do this by yourself, but I recommend doing it as a team or even as an organization. You’d be surprised at the kinds of conversations that emerge when you start talking about your community, especially as it is understood by various departments in your organization.
- Create a chart – either on a whiteboard, a flipchart, or even a document on your computer.
- The 1st column has all of your groups or segments of the community;
- The 2nd column is their goal – try to keep this as general as possible like the examples above.
- The 3rd column is your goal for the interaction with that group, and again you want to keep it pretty high level.
- The 4th column is for the tools where that segment wants to be interacting with you.
Step 1: Identify all the groups within your community.
To start mapping the community we need to first identify which groups are within it. Do you have volunteers, interns, or adjunct staff? Maybe you work with schools so you have segments for teachers, administrators, parents, students, and then groups outside of the school. Here are some questions that can help get people talking to start sharing the groups they work with.
In my experience, the more diverse group you can get together to have this conversation and work through this planning together, the more complete a picture you can draw of your community. When people who work in services, programs, grant writing and fundraising, for example, all share their view of the groups in the community, not only can you start mapping the network but you can also have really rich discussions about the way different parts of your organization view the community.
Step 2: Define the goals that match each group.
There are two sets of goals to be discussed here: the first are the goals of that group – what do they want from you, why do they want to come to you, what do they get out of it? The second are the goals your organization has for that group – what are you hoping they will do, how will they contribute, what are you asking for from them? Again, this conversation can be really eye-opening as a part of building the community map, but also as far as encouraging dialogue within your organization and providing clarity around the organizational goals and the way they play out with the community engagement.
Step 3: Identify the tools.
This means identifying the spaces, platforms, and applications where each group congregates and where you can communicate with them. Even though much of these will be online social technologies, don’t forget about the offline spaces, too. Identifying the mechanisms you can use to communicate with each group can help you target your efforts, but in many cases illuminates areas where only one or a couple groups use a certain platform, while others use another – not only will this help you figure out where to say things, but can dramatically change what you say where.
Here’s an example:
What next: Using this as an exercise for a team or staff meeting, or even retreat, really gets people talking and sharing experiences from different departments and can help the entire group feel better positioned to engage.


2 thoughts on “DIY Community Mapping”